v6 Migration Guide
Bender has released Firmware v6.2.2. With this come multiple changes to certain features. This guide intends to help with migrating your setup to v6.2.2.
For additional info on features and improvements, see the Release Notes you receive via E-Mail.
1 Upgrading to v6
Only upgrade to Firmware v6 from a Charge Controller with 5.38.2 or newer installed.
2 Manufacturer Config UI login
You were able to log into the Legacy Config UI as a Manufacturer. You can now additionally log into the Config UI as a Manufacturer.
Almost all Manufacturer parameters have been moved to the Config UI.
The parameters that have been moved keep living additionally under the Legacy Config UI as before.
2.1 Manufacturer section in the Config UI
Logging in as Manufacturer provides the additional Manufacturer menu in the Config UI, with the following sub-sections:
Section | What it’s for |
|---|---|
| # Manufacturer | Device identification, manufacturer information, serial numbers, branding, and HEMS device naming |
| # Master/Slave | Configures whether the controller operates in a master/slave setup |
| # Meter | Selects the connected energy meter and which meter types can be used as secondary meters |
| # LCD Display | Configures display hardware, display role, shown charging information, and related HMI behavior |
| # RFID & Authorization | Controls RFID recovery and external authorization-input behavior |
| # Cable & Sockets | Configures attached charging cable and Schuko socket support |
| # Control Pilot | Configures CP-line behavior, vehicle-state handling, overload detection, diagnostics, and diode detection |
| # Current & Safety | Sets current limits and safety-related hardware/features such as contactor monitoring, RCD/RDC-M, SPD, actuator, and relay monitoring |
| # Backend I/O | Configures backend control and notifications for hardware inputs and outputs |
| # Temperature & Derating | Configures temperature thresholds, charging-current reduction, fan/heater control, and thermal protection |
| # Password & Security | Configures password/security policies, tamper detection, signed updates, and SSH access by interface |
3 Local whitelist
Whitelist CSV import and export now use a separate Connector column.
Before
Connector information was appended to the ID using _1 or _2.
Idis requiredConnector,Number, andNameare optionalConnectoraccepts1,2, or an empty value- Leave
Connectorempty when no specific connector applies - Old
_1/_2suffixes inIdare no longer supported
3.1 Connector handling
Export uses the same column order shown above. Entries without a connector are exported with an empty Connector.
4 Name and Number now shorter
The fields for Name and Number had no limit before, now, they're limited to 50 characters each:
4.1 Recommended actions
- Verify shortening of
NameorNumberdoes not affect identification of EVs for your purposes. If it does, consider updating the fields accordingly before switching to firmware v6 - The underlying persistency storage pattern stays the same, merely the ingestion and export of whitelist entries has changed.
5 DLM UI update
Configuring DLM is now done via the DLM Editor (DLM configuration widget).
The DLM Editor provides a visual representation of the charging installation instead of one flat list of parameters. Settings are grouped under the corresponding element in the installation.
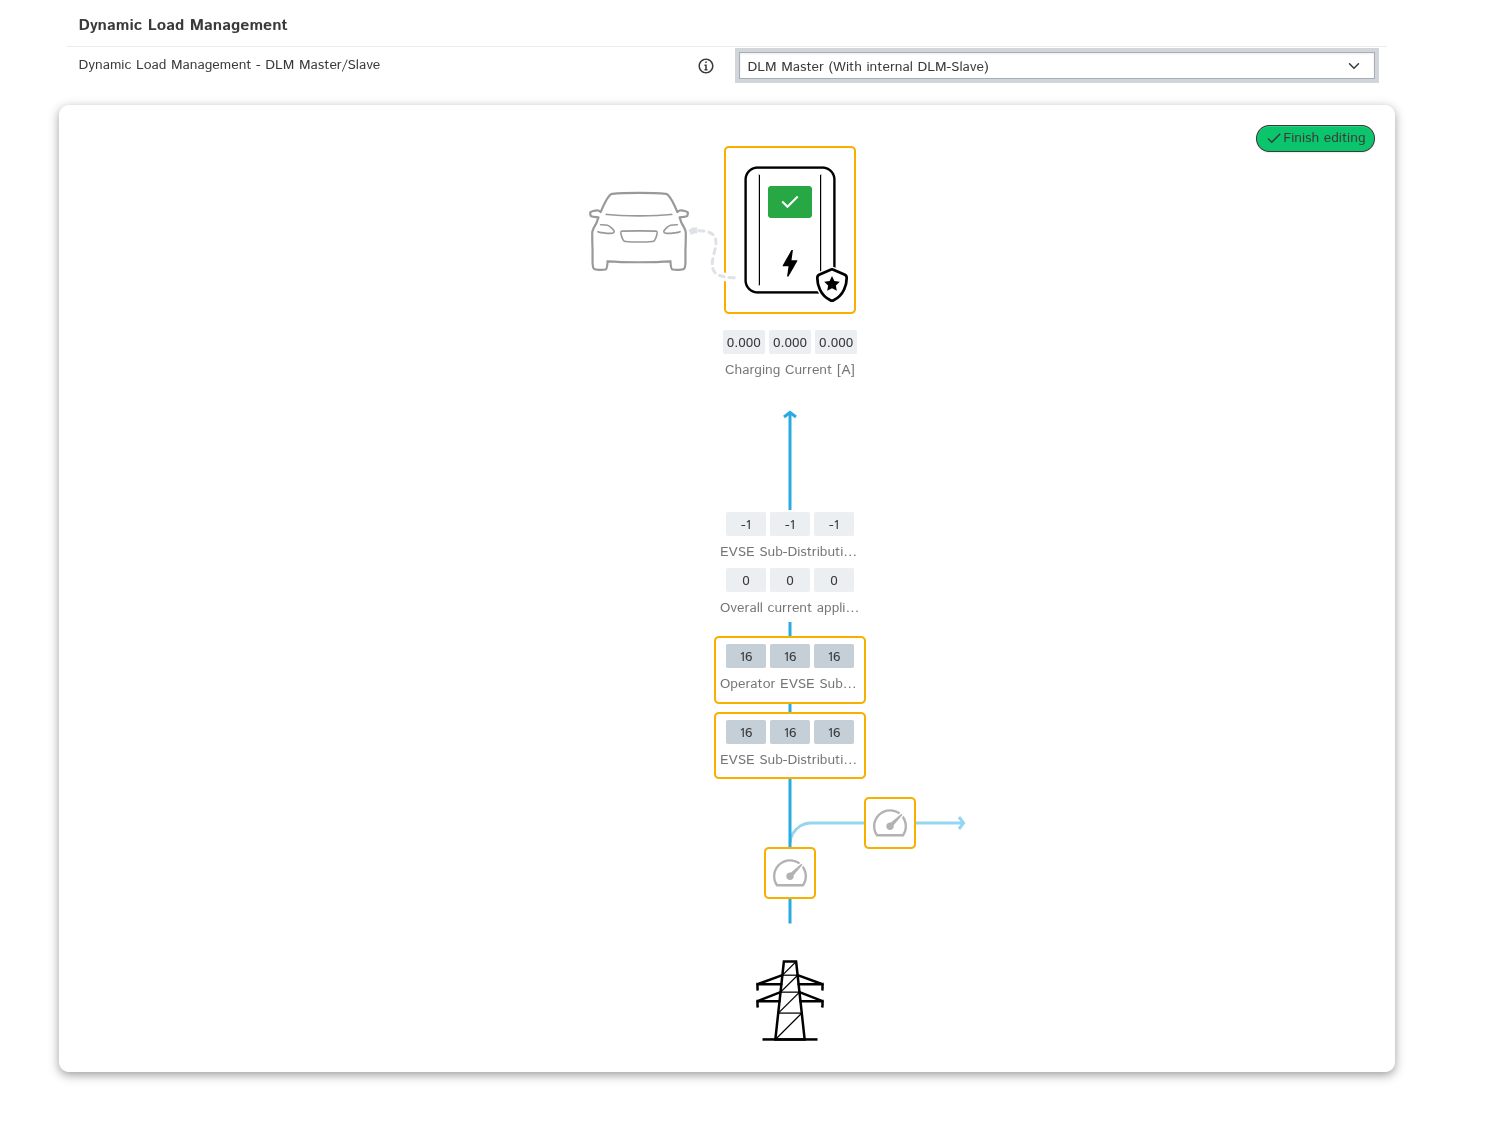 DLM Editor in edit mode with a DLM Master installation
For DLM behavior, parameter details, and OCPP keys, see the DLM reference.
The Config UI supports DLM Master configuration only. DLM Slave settings are not available in this interface. Use the Legacy Config UI to configure a DLM Slave. See Config UI access instructions.
The DLM Editor contains several Indicators and Settings. Most Settings show up once in Edit Mode.
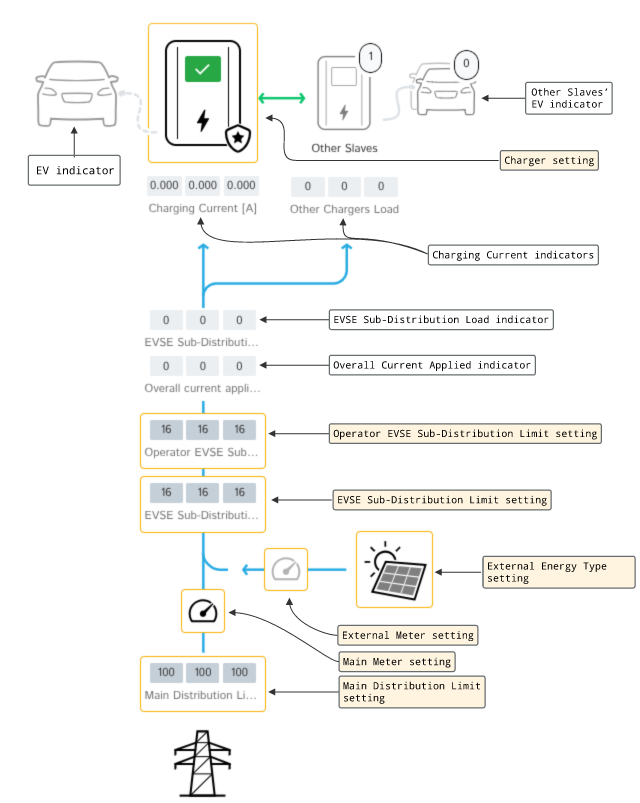 DLM Editor in edit mode with a DLM Master installation. Annotated.
5.1 Configuring DLM with the DLM Editor
Open LOAD MANAGEMENT > Dynamic Load Management. Select the desired DLM role from the dropdown. The DLM Editor appears once you select a role.
- Click Edit to enter Edit Mode
- Click on a Setting and adapt the values to what you need
- Click Finish editing
- Click Save to apply the changes
Finish editing does not save changes; they remain pending until you select Save or Reset all changes.
5.2 DLM settings
UI element to select | Icon | Contained parameters |
|---|---|---|
| # Charger setting |  |
|
| # EVSE Sub-Distribution Limit setting | ||
| # Operator EVSE Sub-Distribution Limit setting | ||
| # Main Meter setting |  |
|
| # External Meter setting |
| |
| # External Energy Type setting |   | |
| # Main Distribution Limit setting |
5.3 FAQ
Configuring Slaves is done outside the DLM Editor and no changes have been made to this.
No. Changes remain pending until you click Save and Restart.
6 OCPP 2.0.1
Firmware v6.2.2 introduces OCPP 2.0.1 support, based on the OCPP 2.0.1 edition 4 specification.
6.1 Enabling OCPP 2.0.1
- Log into the Config UI as Operator
- Under Backend > Connection set to
EthernetorWLAN - Scroll down to the OCPP section and set to
OCPP-J 2.0 - Scroll down to the OCPP 2.0.1 section
- Set
CSMS URL (Profile Slot 0)to your Backend URL - Make sure
CSMS Mode (Profile Slot 0)is set to OCPP-J 2.0 - Save the changes and Restart
6.2 Additional notes
6.2.1 Shared and OCPP-mode specific settings
OCPP settings can be categorized into shared OCPP and OCPP 2.0.1-specific settings. Some general settings are shared between all OCPP Modes (OCPP 1.6/OCPP 2.0.1)
This means that if you're staying on OCPP 1.6 you need to only make changes within the Backend > OCPP section. If you're on OCPP 2.0.1, you will make changes within Backend > OCPP and Backend > OCPP 2.0.1
I.e., for changing the identity of the station you would change the value of , regardless of which OCPP mode you're running (OCPP 1.6/OCPP 2.0.1).
6.2.2 Profile Slots
Profile Slots are a concept introduced by the OCPP standard in OCPP 2.0.1.
How it works:
For instance, you may set up a configuration on Profile Slot 0 for your OCPP 2.0.1 backend and use Profile Slot 1 to fall back onto your OCPP 1.6 Backend.
Do note that the settings within Backend > OCPP 2.0.1 are only active if under Backend > OCPP is set to OCPP-J 2.0.1.
6.2.3 Reading and updating parameters via OCPP
OCPP 2.0.1 comes with a new model for exposing readable/writeable configuration parameters. This deprecates the previously used GetConfiguration/SetConfiguration methods.
The Charge Controller currently exposes a limited set of Device Model variables through GetVariables and SetVariables
6.2.4 OCPP 2.0.1 feature scope
- Supported profiles:
- Core profile
- Advanced Security Profile
- Smart Charging: Currently not supported
6.3 Device Model reference
The following Device Model variables are currently exposed for usage by OCPP Backends:
Component⬍ | Variable⬍ | Permissions⬍ | Notes⬍ |
|---|---|---|---|
#OCPPCommCtrlr | MessageTimeout (Default) | Read | |
FileTransferProtocols | Read | ||
MessageAttempts (TransactionEvent) | Read-Write | ||
MessageAttemptInterval (TransactionEvent) | Read-Write | ||
UnlockOnEVSideDisconnect | Read-Write | ||
OfflineThreshold | Read-Write | ||
RetryBackOffRepeatTimes | Read-Write | ||
RetryBackOffRandomRange | Read-Write | ||
RetryBackOffWaitMinimum | Read-Write | ||
WebSocketPingInterval | Read-Write | ||
#SecurityCtrlr | BasicAuthPassword | Write | |
Identity | Read-Write | ||
SecurityProfile | Read | ||
#AuthCtrlr | Enabled | Read-Write | |
AuthorizeRemoteStart | Read-Write | ||
LocalAuthorizeOffline | Read-Write | ||
DisableRemoteAuthorization | Read-Write | ||
#TxCtrlr | EVConnectionTimeOut | Read-Write | |
StopTxOnEVSideDisconnect | Read | ||
TxStartPoint | Read | ||
TxStopPoint | Read | ||
StopTxOnInvalidId | Read-Write | ||
#SampledDataCtrlr | TxEndedMeasurands | Read-Write | |
TxEndedInterval | Read-Write | ||
TxStartedMeasurands | Read-Write | ||
TxUpdatedMeasurands | Read-Write | ||
TxUpdatedInterval | Read-Write | ||
#AlignedDataCtrlr | Enabled | Read-Write | |
Available | Read | ||
Measurands | Read-Write | ||
Interval | Read-Write | ||
SendDuringIdle | Read-Write | ||
TxEndedMeasurands | Read-Write | ||
TxEndedInterval | Read-Write | ||
#MonitoringCtrlr | OfflineQueuingSeverity | Read-Write |